Summary
Digital Experience Engine (DXE) has a simplified user system that allows you to invite other users and admins to your site. All DXE users can update their own information. DXE Managers can create users, assign roles, and update all other users' information.
This article has the following sections:
Adding users
- Click People in the DXE Toolbar.
- Click the + Add user button.
- Set the following fields -
- Username: (required) The username that the user will enter when logging into DXE
- Email address: (required) The email address where opt-in notifications or account updates for this user is sent to
- Password: (required) The password that this user will enter when logging into DXE
- You will also need to confirm the password in a Confirm password field that appears.
- Notify user of new account: If checked, will send a DXE welcome email to the email address entered above with help for logging into DXE
- Status: The status for this user, two possible choices
- Active: Allows user to log in and use all of their allocated permissions
- Blocked: Prevents the user from logging in
- Roles: The assigned role(s) for this user
- Authenticated user is a pre-configured role in our CMS framework and is the foundation for more specialized roles within DXE. Each user account on your site is automatically given the Authenticated user role, and may optionally be assigned one or more additional roles.
- DXE Manager grants the user permissions to perform all of the actions outlined in this document.
- Picture: File upload module to upload the user's profile picture
- When completed, click Create new account.
You will see a confirmation alert at the top of your screen, and the user will appear in the user list. This user can now log into your DXE site.
Modifying users
- Click People in the top menu.
- Locate the user you would like to modify in the list.
- You can use the filter fields at the top to narrow down larger lists. There is a text entry to enter a full or partial name or email address, Status selector and Role selector. Enter matching criteria and click Filter to only show users who match your set criteria.
- You can use the filter fields at the top to narrow down larger lists. There is a text entry to enter a full or partial name or email address, Status selector and Role selector. Enter matching criteria and click Filter to only show users who match your set criteria.
- Click the Edit button next the user you want to edit.
- Clicking the username will view your site as that user. You will see the site dashboard as that user sees it. If you meant to edit this user instead, click the back button on your browser and select Edit.
- Clicking the username will view your site as that user. You will see the site dashboard as that user sees it. If you meant to edit this user instead, click the back button on your browser and select Edit.
- The edit screen looks much like adding a user, with all the same fields (see step 3 in the Adding users section). Change the fields as necessary.
- You can change a user's password here if they are having difficulty logging in.
- You can change a user's password here if they are having difficulty logging in.
- When finished, click Save.
Blocking users
Blocking a user revokes a user's access to your site, but the user remains in the user list. Access can be reinstated easily by any DXE Manager.
There are two ways to block a user:
- Setting the user's status to Blocked
- Canceling the user's account
For DXE Managers, there is only one difference between these two: canceling allows the option of sending the user an email to confirm their account closure, while changing the user status will not notify the user.
To block a user:
- Click People in the top menu.
- Locate the user you would like to modify in the list.
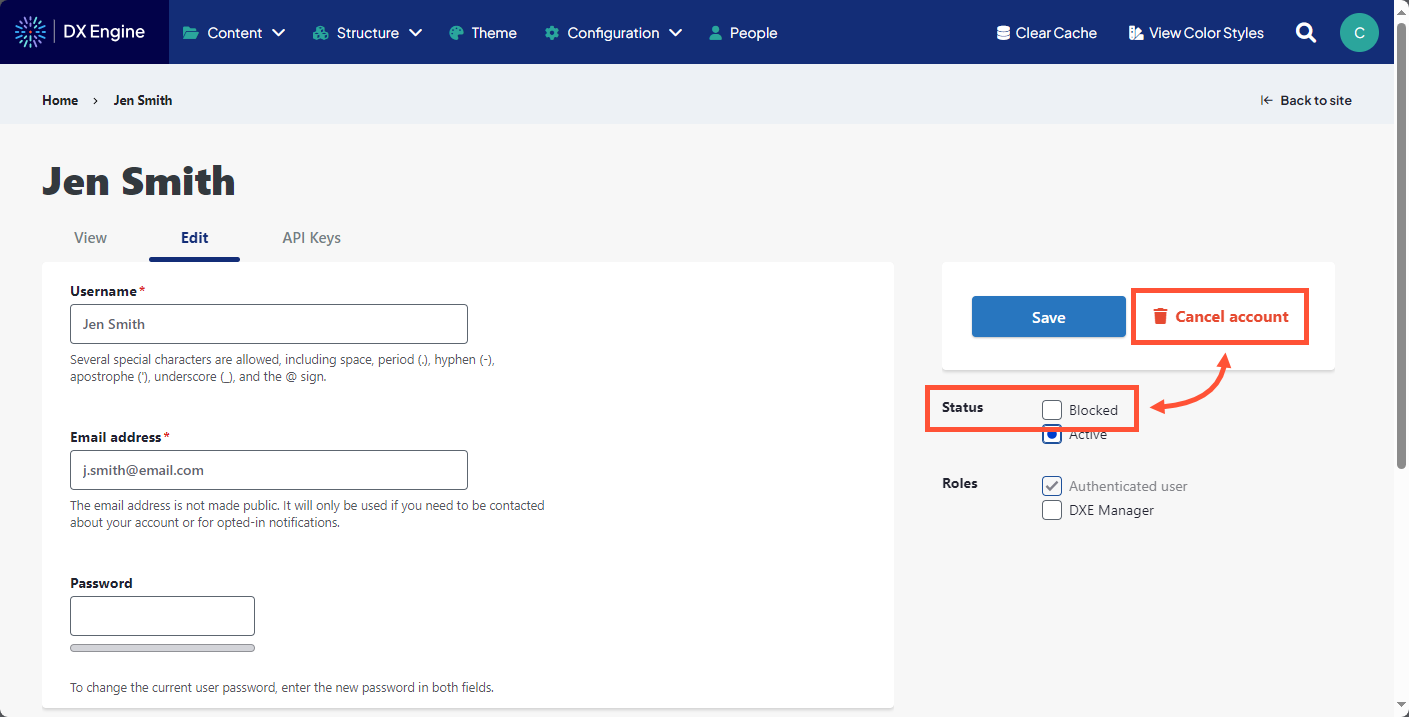
- Click the Edit button next to the user you want to block.
- Perform one of the two block options:
- Set the Status field to Blocked, then click Save.
-OR- - Click Cancel account.
- If clicking cancel, you can mark an optional checkbox to force a user to confirm their account cancelation via email before proceeding.
- If clicking cancel, you can mark an optional checkbox to force a user to confirm their account cancelation via email before proceeding.
- Set the Status field to Blocked, then click Save.
If you need to delete a user from your site entirely, please contact us for help.
Bulk operations
In the user list, you can select several users at once to perform the same action to all of them.
- At the People screen, mark the checkbox next to every user you want to modify.
- A ribbon will appear at the bottom of the screen when you check the first user.
- A ribbon will appear at the bottom of the screen when you check the first user.
- At the bottom of the screen, click the dropdown arrow and select a bulk operation. Possible actions are:
- Update URL alias
- Add the DXE Manager role to the selected user(s)
- Block the selected user(s)
- Cancel the selected user account(s)
- Remove the DXE Manager role from the selected user(s)
- Unblock the selected user(s)
- With a bulk operation selected, click Apply to selected items.
All of the selected users will receive the change you specified.