Frequently Asked Questions
Got a question? Get your answer! Browse through the FAQs below. Additional information is available in the reference articles. If you don't find what you're looking for, please submit a support ticket.
Blocks
A block is a section of content you create, usually if you want it to appear on more than one page. The main difference between creating content and creating blocks is that blocks are reusable. You can place the same block in multiple places on multiple different pages without having to recreate it. Blocks have Visibility settings, where you can set the conditions and pages where the block will appear. When a block is updated, it is also automatically updated everywhere else it is used in your site.
Hidden blocks have been replaced by the Listing Grid component.
When blocks are assigned to any other region on the page, they will appear only in that region (and only when the Visibility settings are met). This is good for site consistency, but there may be cases when you want more control over when and where blocks appear.
Blocks placed in the Hidden Blocks region can be added to any section of the layout by adding a Block Embed component to whichever section you want:
-
Hover over a layout section to reveal and click the + button:

-
In Choose a component, click Block Embed:
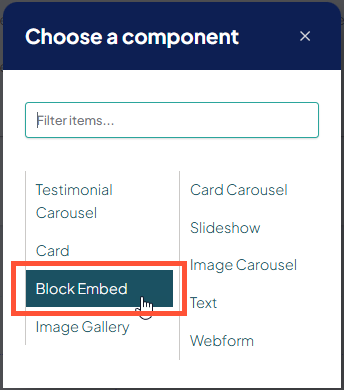
- Enter the name of your Custom Block and select it in the autocomplete suggestions, then click Save.
The Hidden Block will now appear in the section you placed it.
URLs
A node is any piece of individual content (such as an enhanced layout page, a provider profile, or a post article). DXE identifies each page with a unique node ID. If you change the URL, DXE automatically sets up a redirect from the old URL to the new one using the node ID behind the scenes. The node ID can be found in the URL bar when editing a page.
Content
Adding a Marquee Headline appears as the new title of the page. However, the original Title field stays part of the article record in the database. The breadcrumbs on the page will always reference the latter Title field.
If you have multiple regions (and therefore multiple pages titled the same, such as several "About Us" pages), adding the region to the Titles can help keep those articles organized and easy to differentiate while managing your content. Each article title will appear to the user as “About Us”, but in the database the titles will display the region (such as “About Us (North),” “About Us (East),”etc.)
You can use the filters on the Content page to filter for only the content you want to manage. You can filter for Title, Content type, or Published status. There is also the option to manage types of content such as by Provider, Location, etc. with unique filters available.
This is different from clearing your browser cache— instead this clears the cache of DXE behind the scenes, forcing new content to be reloaded. You’ll typically use this for larger, site-wide updates that may take a little longer to process. It may take 30 seconds or so to reload your page and clear the cache that DXE uses to feed page contents.
The user roles and permissions will need to be updated to allow edits in some cases. Reach out with a support ticket to get this added.
Any images added to an article are placed in a folder labeled with the current month (MM-YYYY) in IMCE File Manager by default. To add the same image to another place: instead of uploading again, you can select the image in IMCE File Manager in the Body editor:
-
Click in the Body where you want to insert the image, then click the Insert Image button:

- In the File Manager window, browse the folder tree in the top left pane to the folder where the image was loaded (If you uploaded in the same month, the folder will be labeled with the current month/year in “MM-YYYY” format).
-
Click the image file name in the top right pane. The bottom pane will show a preview of the image file. Then click Select.
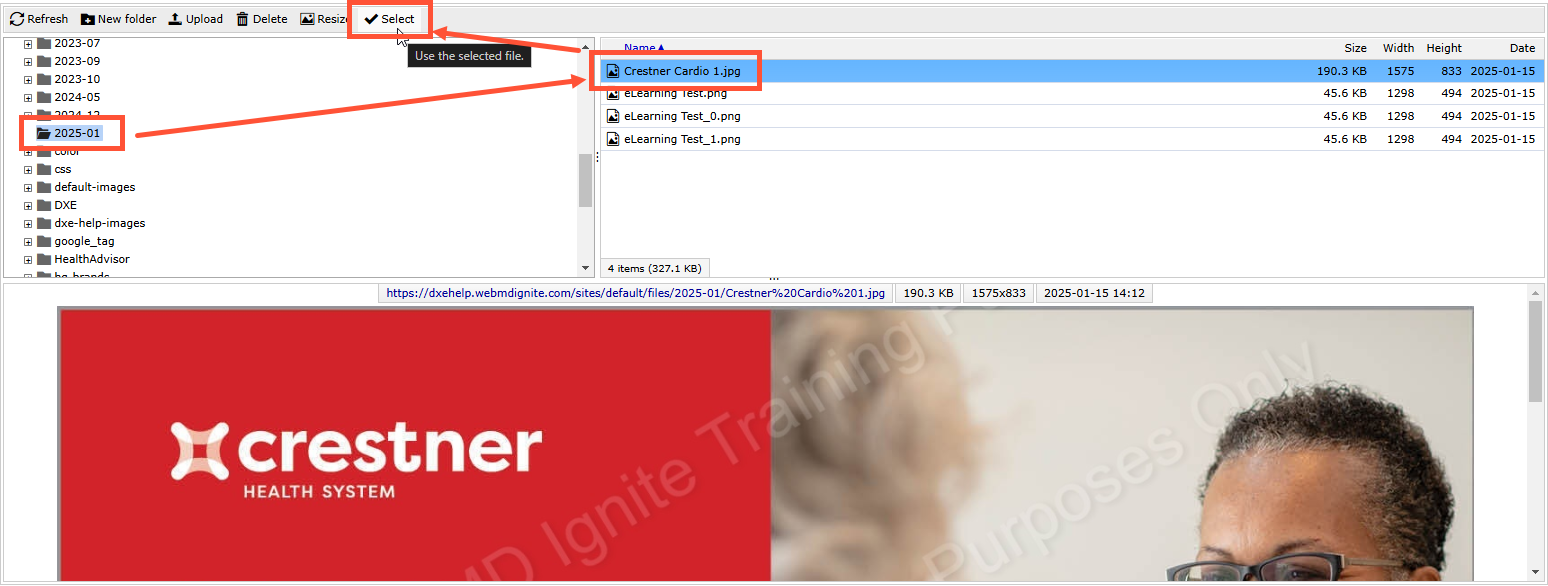
The image will insert in the Body where the cursor was, without having to upload it a second time.
The image is likely being used on a “draft” or revisions page and may not be visible to those visiting your site, but still considered “in use” by DXE.
Unused images can simply be left in IMCE File Manager and will not cause problems with your published content. This is likely the easiest path forward. If an “in use” file/image must be deleted from your site, the source of the file lock must be tracked down and addressed. Please contact support and we will assist you to our best ability.
Click Content in the Toolbar to view a list of content in your DXE site (including unpublished content). You will also see a Records per page dropdown, which you can set to the maximum number of records to display on screen at once.
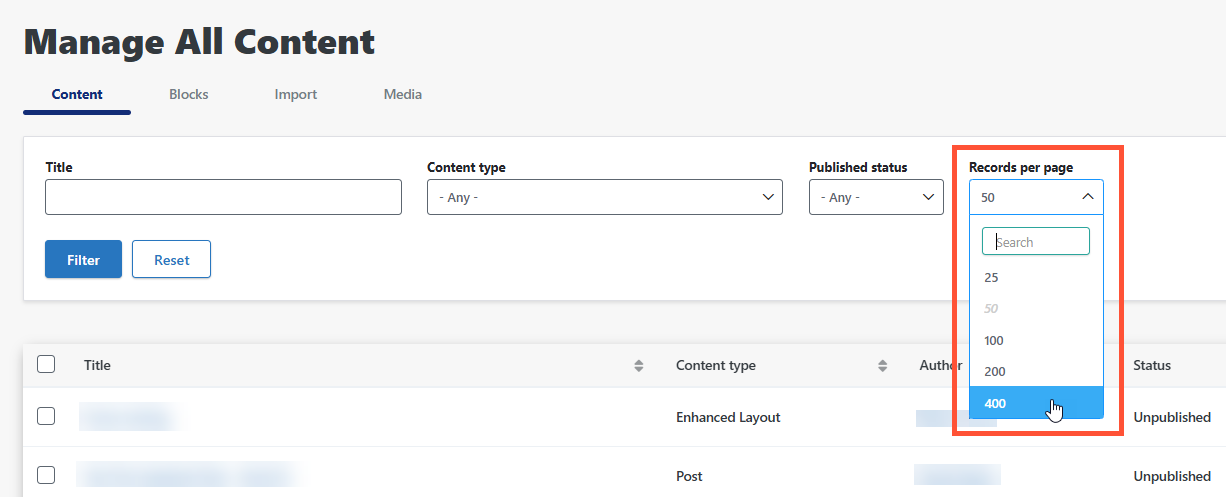
From there, click the checkbox in the list headers to select all the available nodes. A Bulk Edits bar will appear at the bottom of the browser window:

In the Bulk Edits bar: open the dropdown, select Export CSV, then click Apply to selected:
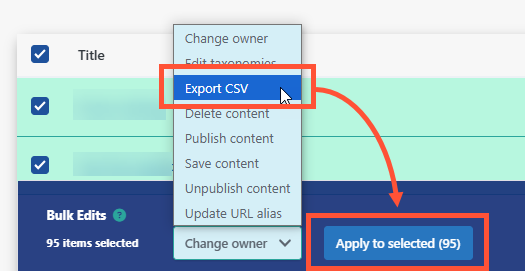
A CSV file will download. This is a list of the selected nodes with numerous attributes recorded for each node, including the page titles.
Menus
Navigate to Structure > Menus and select the menu you would like to edit. You can create links and nest them as children of a parent link. While editing a page with a menu on it, you can always assign where in a menu to place a new page.
Please see our Menus page for more info!
Taxonomy
Manage bulk taxonomy edits:
Click Content in the Toolbar, select Content Type and Records Per Page: All.
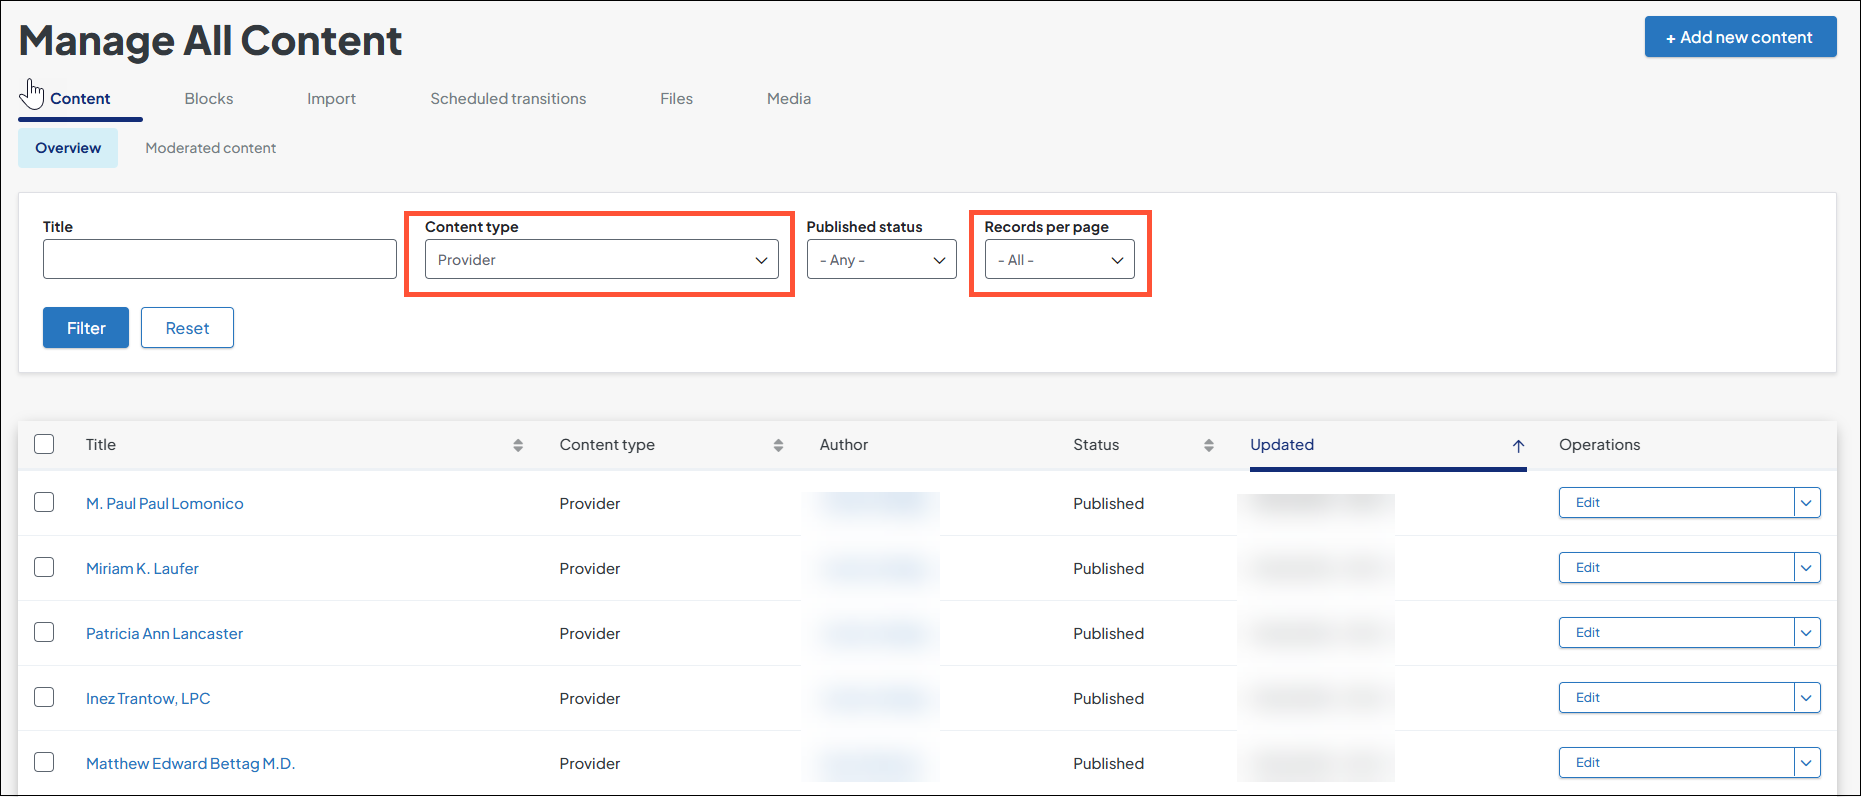
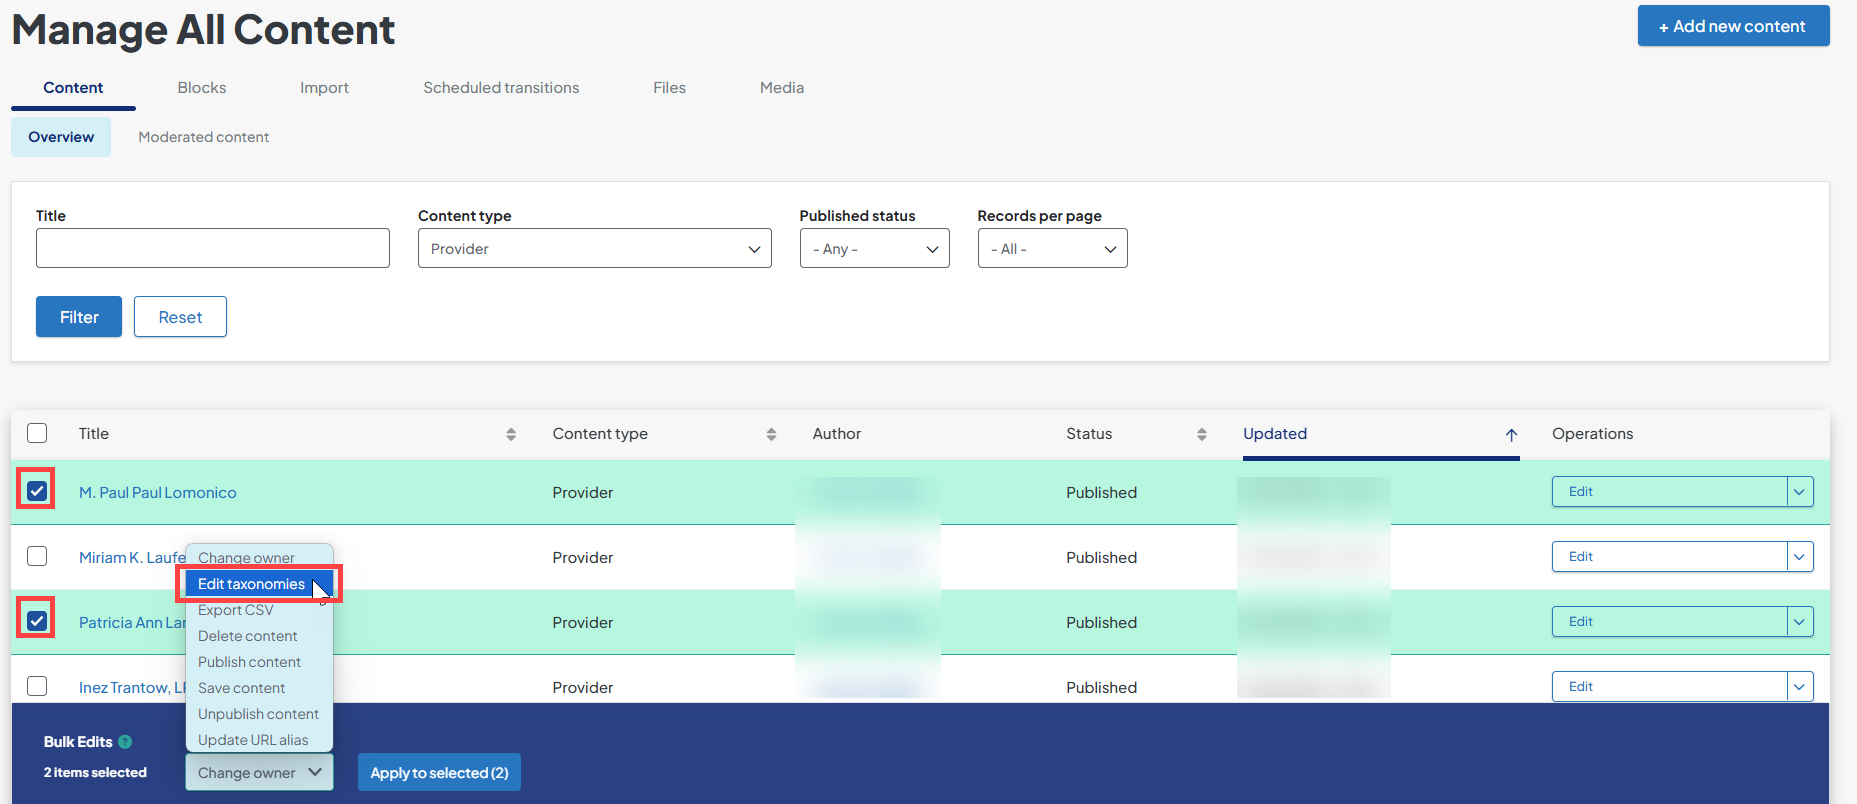
Select the pages to edit taxonomies. Select Edit taxonomies. Choose Apply to selected.
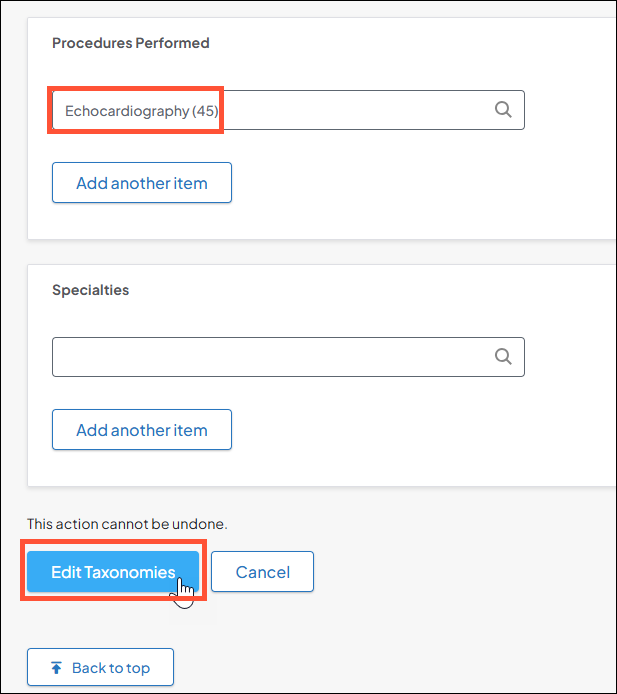
Search for and add the taxonomies needed. Choose Edit Taxonomies.
Theme
The Theme settings include configuration for how brand styles are applied to the interface, settings for various DXE features like provider search, and general user experience options. Text colors; styling for tables, accordions, cards, and other elements; navigation menu color and behavior and so much more are set in the Theme. Each of these settings can be changed independently.
Theme settings don’t need to be updated on any regular schedule, however there are practical scenarios when you may want to make adjustments, such as:
- Rebranding: you can create a new Brand for your site, then connect it in the Theme settings to update your entire site all at once. You can also set Conditional Brands to change the look of your site on certain pages or in certain scenarios.
- Customizing the DXE Provider Search
- Setting an alternate Provider search engine
Please see our Theme article for more info!
User Management
You may need an additional role to enable Events in DXE. Please reach out with a support ticket to get this role updated.
